Write a First Module
Prerequisites
A working installation of DV on your computer
macOS Make sure to also install the
dv-runtimepackage via brewWindows Development on Windows is not yet supported
Knowledge of C++ programming
A working C++ toolchain for your system, including cmake
Your C++ editor or IDE of choice
Start a new project
A demo module that counts events can be found on Gitlab. (https://gitlab.com/inivation/dv/dv-example-cpp).
Clone the start module repository with git
git clone https://gitlab.com/inivation/dv/dv-example-cpp.git
Rename project
After downloading, let’s rename the project first. First, rename the project folder
mv dv-example-cpp my-first-module
after that, rename the project name in the CMakeLists.txt file by changing the line PROJECT(dv-example-cpp C CXX)
with your favourite text editor. For example, you could change it to PROJECT(my-first-module C CXX).
Command Line Build
To build the demo module from terminal, use the following commands:
cd my-first-module
cmake .
make -j2 -s
sudo make install
If everything goes well, you should end up with a file my-first-module.(so|dylib) in the modules directory.
IDE
QT Creator
Click File -> Open File or Project… and select the projects CMakeLists.txt. Configure the project by selecting the builds you want to create and specify their location or use the default.
CLion
Click File -> Open and select the project root directory. CLion should automatically detect the project as a CMake
project and try to run cmake in the project folder.
Eclipse
Eclipse does not support cmake natively yet. It does however support Makefile projects. Since cmake essentially generates a Makefile, we can run cmake in the command line and open the resulting project in Eclipse.
Run cmake in the project directory
cmake .
Now, you can import it into Eclipse with File -> Import… -> Existing Code as Makefile Project.
Other
The project is a simple CMake project. If your IDE supports CMake, it should be capable of opening the project out of the box.
Run configuration
Set your IDEs run configuration to launch dv-runtime. dv-runtime is (most likely) in /usr/bin (Linux) or
/usr/local/bin (macOS).

Run configuration for QT Creator (Projects -> Build & Run -> Run).
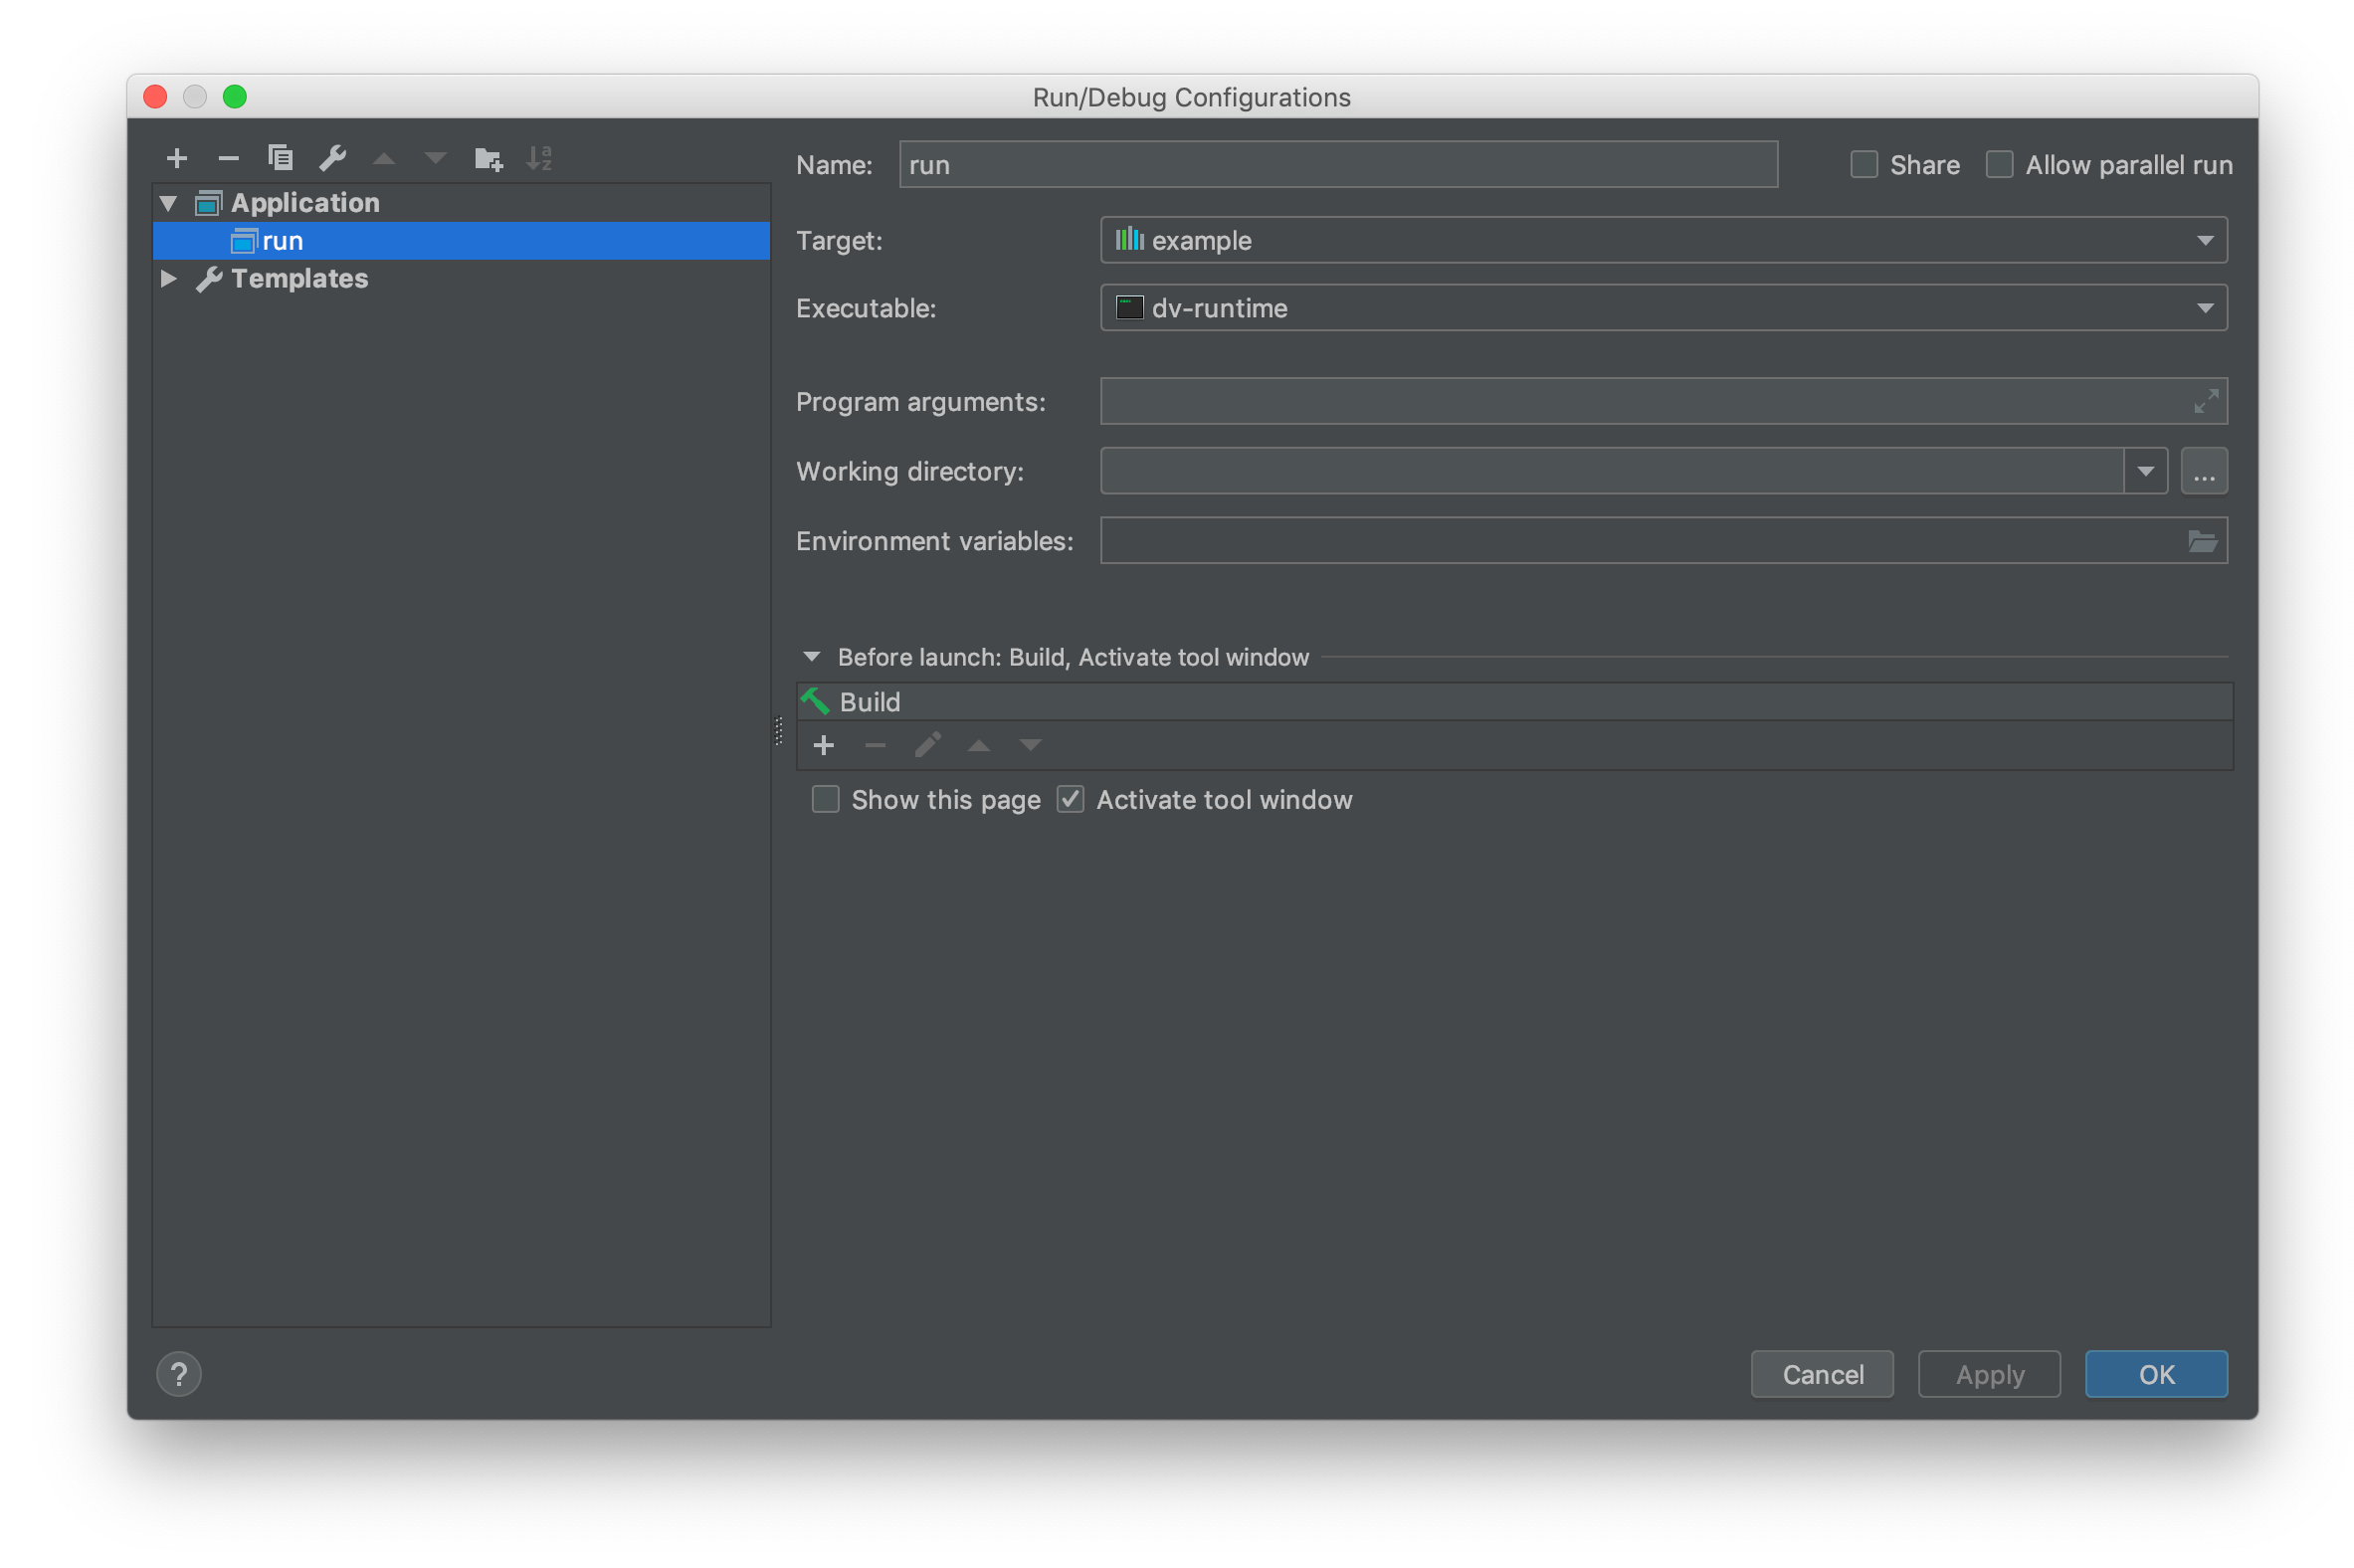 Run configuration for CLion.
To have DV load modules automatically when running the project within an IDE, add
DV_MODULES_PATH=$PATH_TO_MODULE_PROJECT to Environment variables. ($PATH_TO_MODULE_PROJECT is a path to the
project root directory of your new module.)
Set up DV
To iteratively test a module, you will have to set up DV the following way
Launch DV
Disable Connect to -> Manage local runtime instances. This tells DV to not start its own runtime, and just wait for someone else to start a runtime in its behalf.
Select Shutdown if DV asks to shut down the current instance.
DV is now waiting for a runtime to be started externally, and will connect as soon as one is started
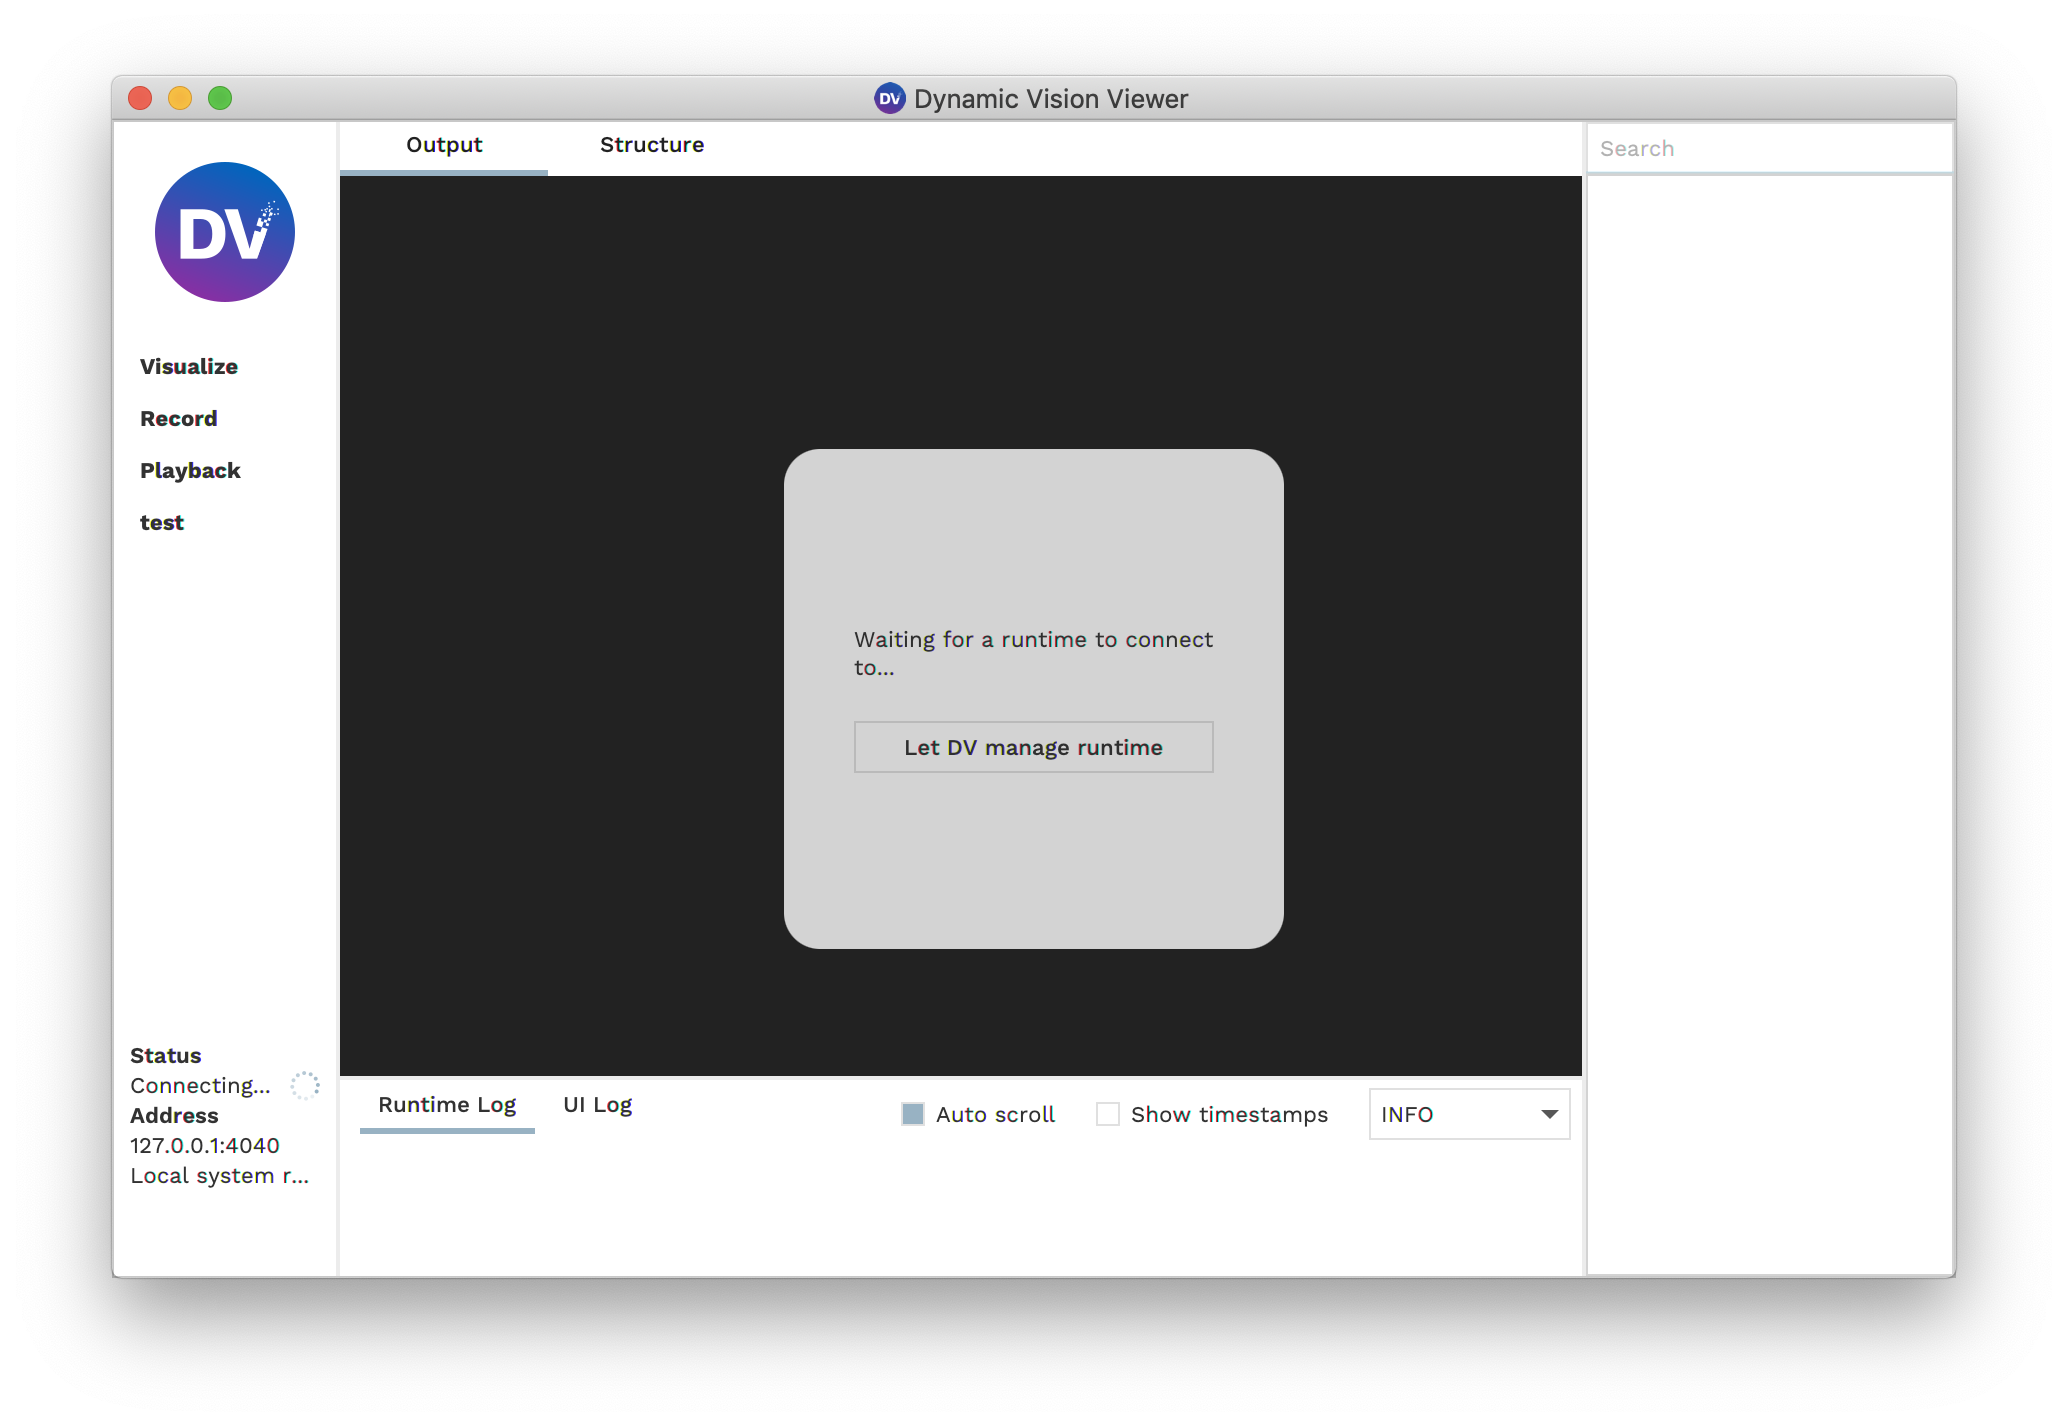
Start your runtime by clicking the play button in your IDE. Make sure to have set up your IDE run configuration as described above.
As soon as DV connects to the runtime, select the Structure tab, click on Add module and select Modify module search path.
Click on Add path and add the path where you compiled your modules project directory. Click on Done.
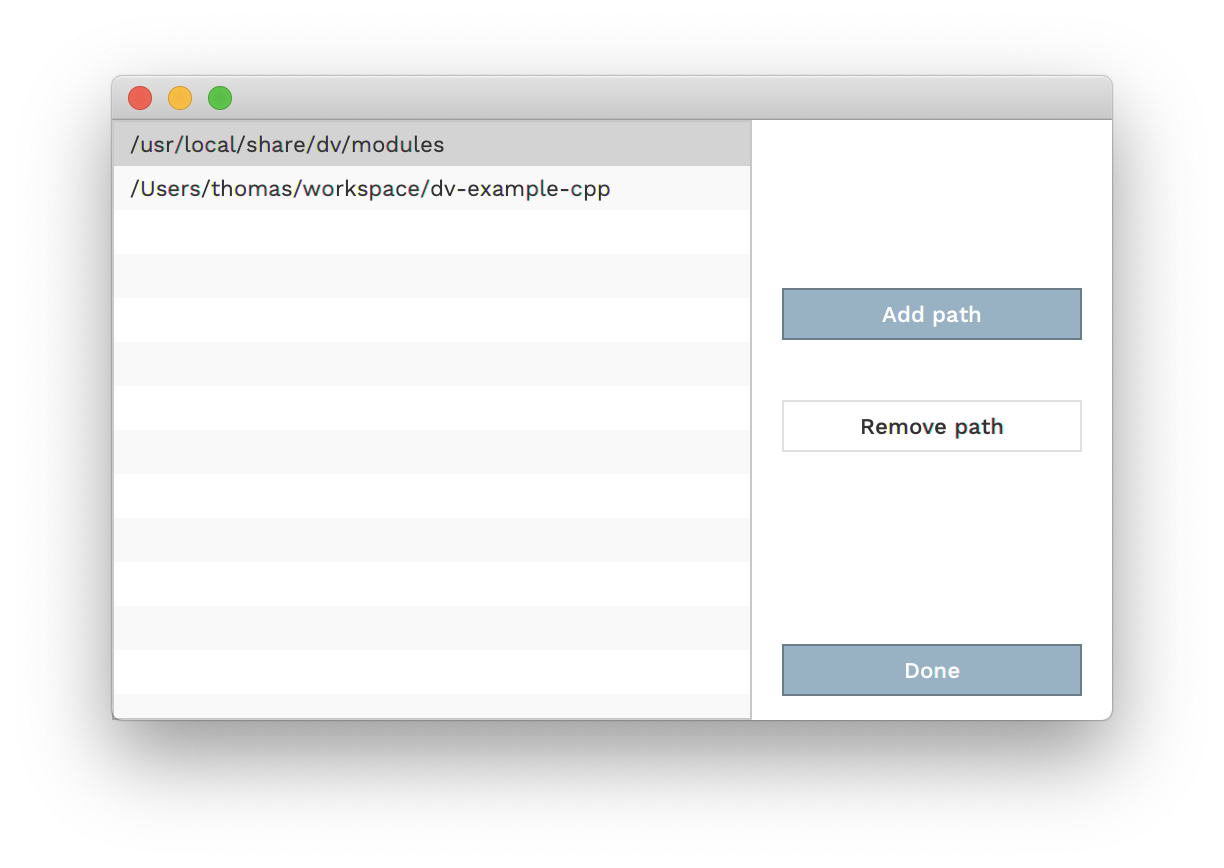
Click on
Add moduleagain. If your module compiled succesfully, it should show up in the list of available modules to add. Click on your module name.
Connect the input and outputs of your module. Drag the connections from outputs into your modules inputs, and drag connections from your modules outputs to other inputs.
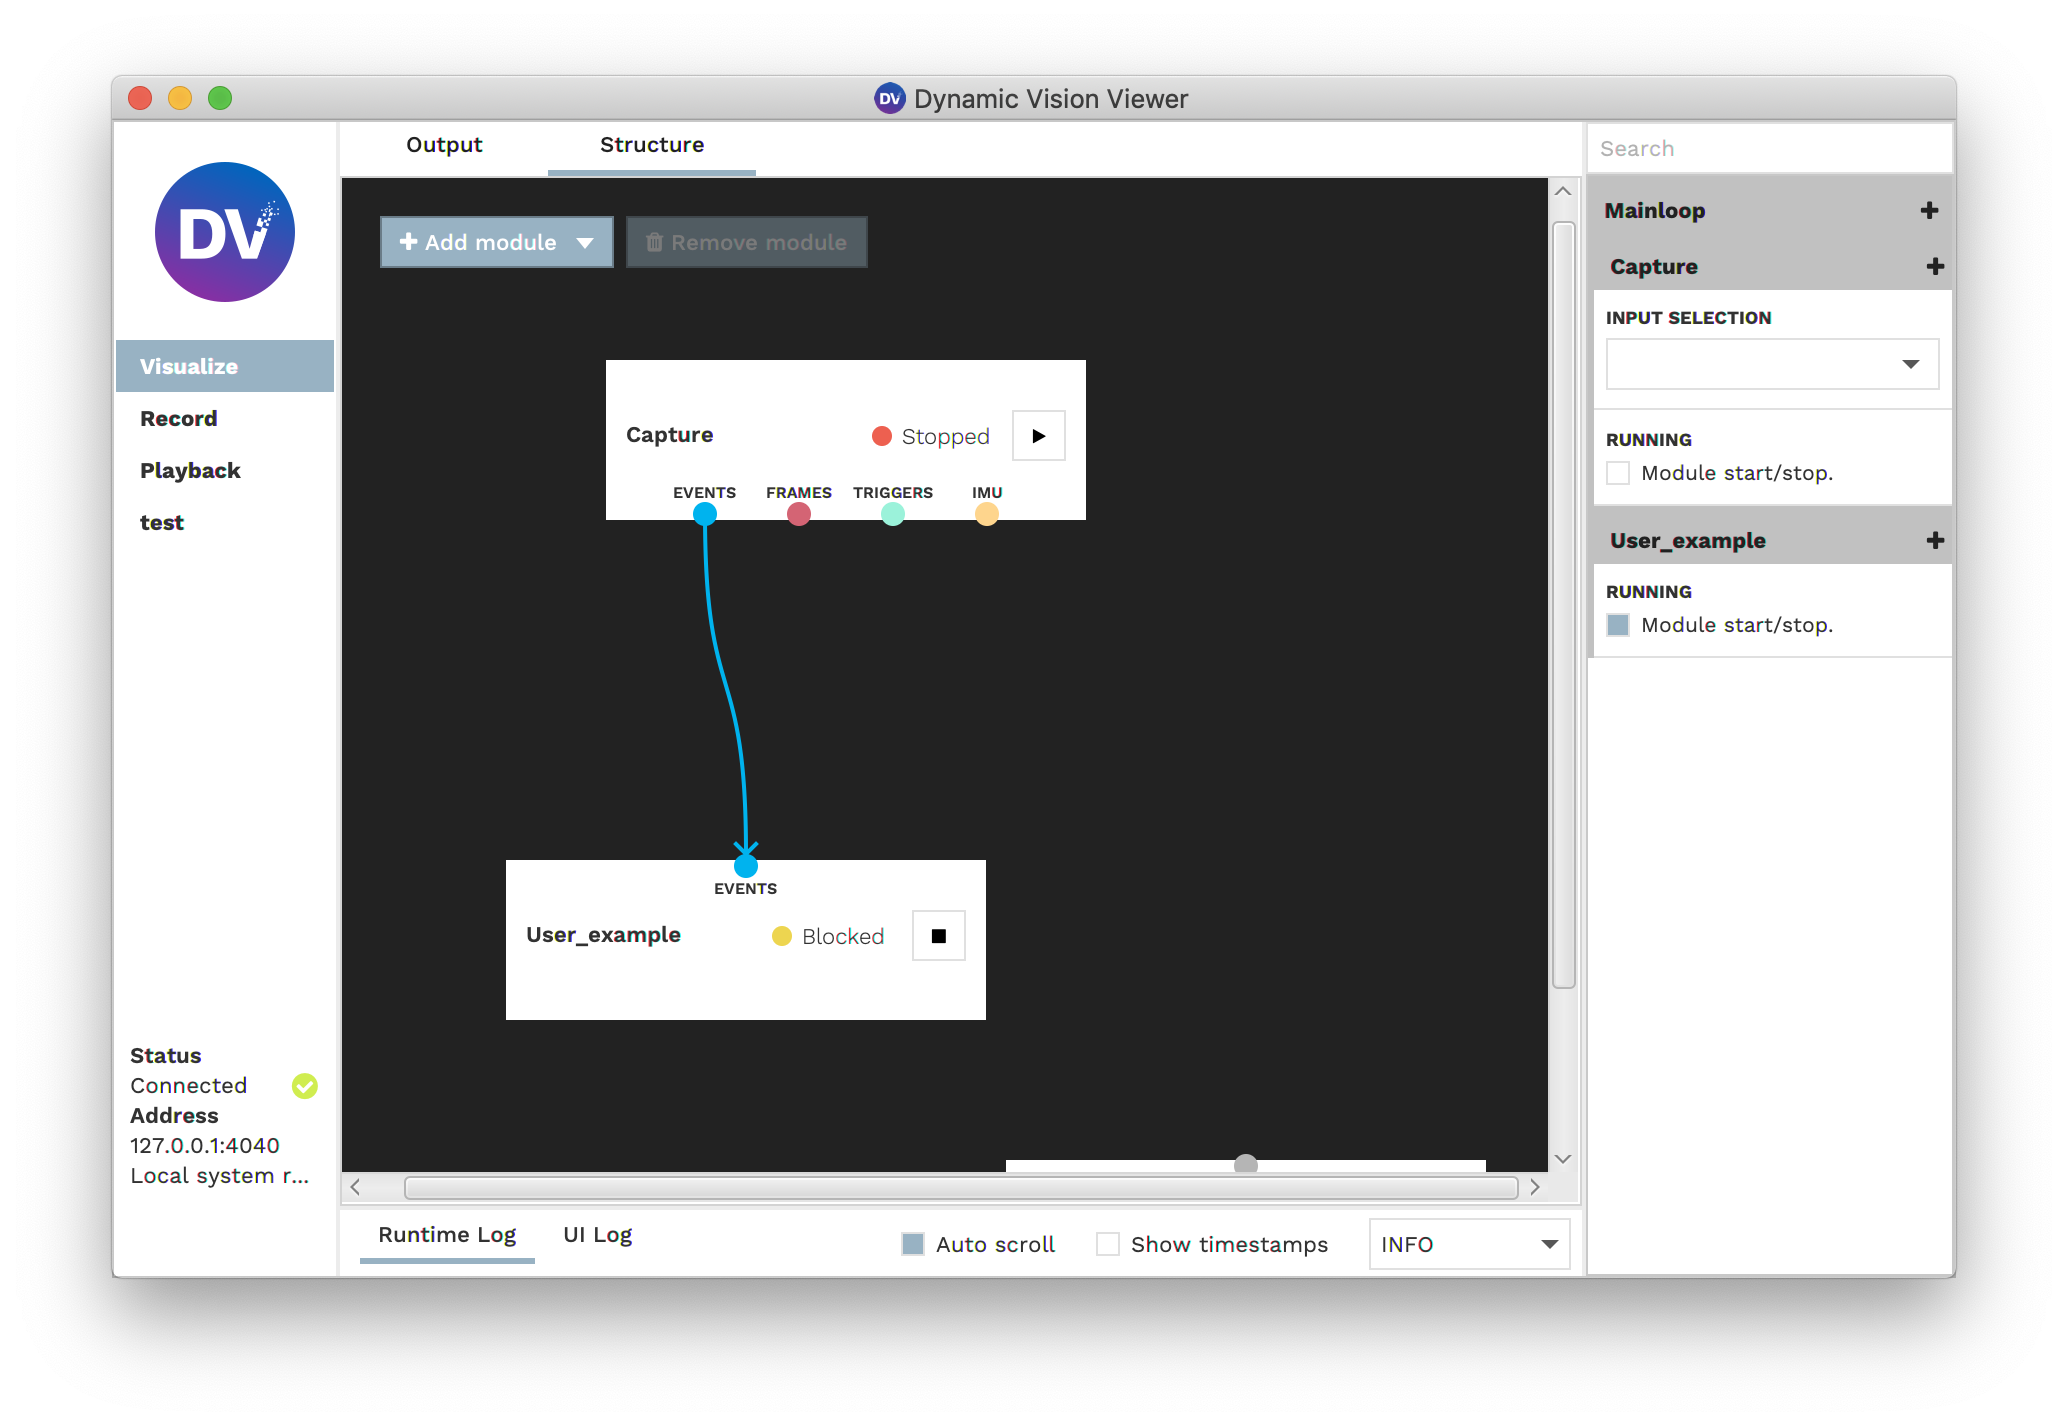
Click the Play Button on your module to start it.
If your module is working, you should see your expected outputs.
Adapt the module
Getting event data from an input
Event data gets passed between modules in packets. The size of event packets is decided by the interval the preceeding
module emits the packets. The run function gets executed whenever there is new data available, or, when nothing
happens, periodically.
Every module has inputs. Inputs are defined in the initInputs function. The demo module we just compiled before, has
an events input called “events”. To access the most recently arrived data packet on this input and iterate over the
events, override the run function as such:
void run() override {
    auto inData = inputs.getEventInput("events").events();

    for (const auto &event : inData) {
        // do something with the events
    }
}
Getting meta data from an input
Input do not only provide raw data, they also provide (static) meta information, such as width and height dimensions. For example, to get the width and height of the event input, write:
int width = inputs.getEventInput("events").sizeX();
int height = inputs.getEventInput("events").sizeY();
There is a simple counting algorithm already implemented in the example project
Adding outputs
Modules can not only take data, they can also output data to subsequent modules. Module outputs are defined in the
static initOutputs function. Since the example module we worked on so far, does not have an initOutputs function, we
add it like so
static void initOutputs(dv::OutputDefinitionList &out) {
    out.addEventOutput("events");
}
The out.addEventOutput("events"); line adds an output of the event type, with the name “events” to the module.
Contrary to the input case, we’re not entierly done yet. Any output you define in your module has to be assigned its
required meta data. For example, an event output needs to have an assigned width and height to it. It is common that you
would want to setup the output with the same dimensions as an input to the module. Since the information to what is
actually connected to an input is only available at run time, we do not perform the setup call in the initOutputs
function, but rather in the classes constructor.
Since our class does not have a constuctor yet, we create one like so:
ExampleModule() {
    outputs.getEventOutput("events").setup(inputs.getEventInput("events"));
}
The line in the constructor body sets up the event output named “events” to the same parameters as the event input named “events”. To set the output up with different parameters, you can call a different setup function like
outputs.getEventOutput("events").setup(346, 260, "Data from example module");
Adding config options
Config options are configurable parameters that are displayed in the gui for easy access. Config options are defined in
the initConfigOptions function. In our example app, the initConfigOptions function already exists. The value of a
config option can be accessed in the run function by calling config.getInt (or similar for other datatypes).
static void initConfigOptions(dv::RuntimeConfig &config) {
	config.add(
		"printInterval", dv::ConfigOption::intOption(
							 "Interval in number of events between consecutive printing of the event number.", 10000));
}
A note on performance: Looking up the value of a config option requires an access to a hashmap with a string key.
This is an efficient operation, but in case of event-by-event processing, it still adds considerable overhead. To solve
this issue, one can override a function void configUpdate() which gets called whenever a config value is changed by
the user. Use this function to look up config values and copy them into local variables to improve performance in the
run function. Example:
void configUpdate() override {
    printInterval = config.getInt("printInterval");
}
Example: Create a refractorary period filter
The complete code for this example can be accessed at gitlab.com/inivation/dv/dv-tutorial-code
Time to make our example module do something useful. A refractory period filter limits the maximum firing rate of a pixel. Whenever an event at a pixel passes through the filter, all subsequent events are discarded until the refractory period is over.
Add private data members
Let’s change the private data members of our class to store the data we need to function
private:
    // user selectable refractory period in microseconds
    long refractoryPeriod;
    // a matrix storing the last firing times for every pixel
    dv::TimeMat lastFiringTimes;
The first integer refractoryPeriod stores a configuration value, where the user can set the refractory period to a
user defined value. The second member lastFiringTimes is of the dv::TimeMat type. dv::TimeMat is a simple matrix
type that stores a 2D array of 64bit integers. We usually use the OpenCV Mat types for handling 2D data. OpenCV does
not provide a 64bit integer type, which is why we provide the dv::TimeMat type. Make sure to include
#include <dv-sdk/processing.hpp>
Set inputs and outputs
Our refractory period filter needs exactly one event input and one event output. We define them as follows:
static void initInputs(dv::InputDefinitionList &in) {
    in.addEventInput("events");
}

static void initOutputs(dv::OutputDefinitionList &out) {
    out.addEventOutput("events");
}
Set description
Let’s set the description of the refractory period filter
static const char *initDescription() {
    return "This module filters events by applying a refractory period to the event timestamps.";
}
Set configuration options
Our refractory period filter should have exactly one configuration option, the option to set the refractory period. The type of the option is long and we set a default of 10ms with sensible range from 1ms to 1000ms.
static void initConfigOptions(dv::RuntimeConfig &config) {
	config.add(
		"refractoryPeriod", dv::ConfigOption::longOption("Refractory period to apply to events (in ms)", 10, 1, 1000));

	config.setPriorityOptions({"refractoryPeriod"});
}
The setPriorityOptions call only makes sure that the config option is exposed to the right side bar of the gui by
default. If you do not specify this, you access the option in the gui by clicking on the black plus icon.
Set constructor
The job of the constructor is all about initializing private data members as well as outputs. We initialize the
lastFiringTimes array as well as the output to the same dimensions as the events input.
ExampleModule() : refractoryPeriod(0), lastFiringTimes(inputs.getEventInput("events").size()) {
	outputs.getEventOutput("events").setup(inputs.getEventInput("events"));
}
Define the config update
The configUpdate function gets called at the start (before run) as well as whenever the config is changed. In our
case, only when the user changes the refractoryPeriod configuration. In the function, we look up the new value and
store it in the private data member. We could look up the value in the run function as well, but since config changes
are quite rare, it makes sense to only do it when there is a change.
void configUpdate() override {
    refractoryPeriod = config.getLong("refractoryPeriod") * 1000;
}
We multiply the value by 1000, to convert the value from miliseconds to microseconds.
Implement run function
The run function is where the actual processing happens. Our refractory period filter is pretty simple:
void run() override {
    auto input = inputs.getEventInput("events");
    auto output = outputs.getEventOutput("events");

    for (const auto &event : input.events()) {
        if ((event.timestamp() - lastFiringTimes.at(event.y(), event.x())) > refractoryPeriod) {
            lastFiringTimes.at(event.y(), event.x()) = event.timestamp();
            output << event;
        }
    }
    output << dv::commit;
}
If the time between the current event and the last firing time at that position is larger than the refractory period, update the last firing time for that pixel and append the event to the output.
After we appended all events the output, calling output << dv::commit; sends the events out in a packet to the next
module.
Congratulations, you built your first useful module!
The complete code for this example can be accessed at gitlab.com/inivation/dv/dv-tutorial-code
Resources
Minimal example module: gitlab.com/inivation/dv/dv-example-cpp
Module with header / code separation: gitlab.com/inivation/dv/dv-tutorial-code/-/tree/master/color-paint-example